 Skip to content
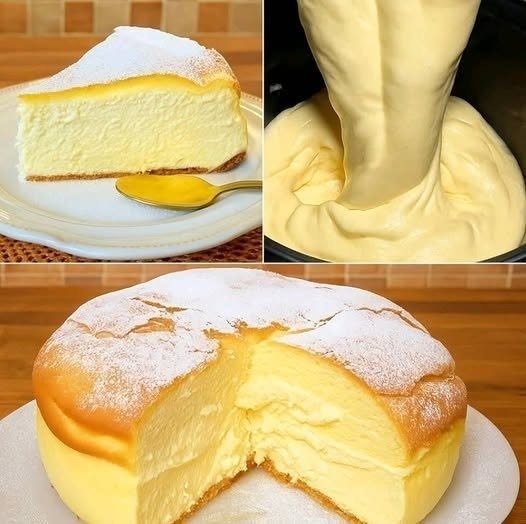
There are days when I want to prepare a dessert that feels special without requiring a long list of ingredients. This homemade keto cloud cake has become one of my favorite choices because it is incredibly light, naturally flourless, and surprisingly easy to prepare.Despite using only a handful of pantry staples, it creates a delicate cake with a soft texture that almost melts in every bite.
Unlike traditional sponge cakes that rely on flour and baking powder, this cake gets its beautiful rise from properly whipped egg whites. The result is a dessert with an airy texture that lives up to its name. Every slice is soft, moist, and lightly sweet, making it perfect for everyday baking or serving to guests.
Table of Contents
Keto Cloud Cake – A Light and Simple Flourless Dessert
A light, creamy, and simple keto-friendly flourless dessert made with Greek yogurt and sweetened condensed milk, perfect for a delicate low-carb treat.
Ingredients
Equipment
What Makes This Keto Cloud Cake Special?
- Cloud cake is quite different from most homemade cakes. Since there is no flour in the batter, the texture is much lighter than a traditional sponge or butter cake. The whipped egg whites create tiny air pockets throughout the batter, allowing the cake to rise naturally while baking.
- Another feature that makes this recipe unique is its short ingredient list. Only five main ingredients are needed, yet they work together to produce a beautifully soft cake. Each ingredient has an important purpose, and none of them overpower the others. Instead, they combine to create a balanced flavor with a delicate vanilla aroma.
- Because the cake contains no wheat flour, it is naturally gluten-free when prepared with gluten-free cornstarch. Although simple, it has an elegant appearance that makes it suitable for birthdays, family gatherings, afternoon tea, or any occasion when a light dessert is preferred.
Why I Enjoy Making This Cake at Home
- Homemade desserts often taste better because I can pay attention to every small detail during preparation. I enjoy watching the egg whites transform into fluffy peaks and carefully folding them into the batter to keep everything light and airy.
- The baking process itself is relaxing. Once the batter is ready, the oven does most of the work while the cake slowly rises into a golden, delicate dessert. After cooling completely and chilling in the refrigerator, the texture becomes even smoother, making every slice neat and easy to serve.
- Another advantage is that the recipe doesn’t require advanced baking skills. As long as the egg whites are whipped correctly and folded gently into the mixture, the cake turns out beautifully. Even beginners can prepare it successfully by following the steps carefully.
Ingredients You’ll Need
- One of the best things about this recipe is that it keeps the ingredient list wonderfully simple. Every ingredient contributes to the final texture and flavor without making the recipe complicated.
- Eggs
- Eggs are the heart of this recipe. The yolks provide richness and help create a smooth batter, while the egg whites are responsible for the cake’s impressive height and airy texture.
- Separating the eggs carefully is one of the most important parts of the recipe. Even a tiny amount of yolk in the whites can make whipping difficult. For the best results, I separate the eggs while they are still cold since the yolks are less likely to break.
- Greek Yogurt
- Full-fat Greek yogurt gives the cake its creamy consistency while keeping it moist. Because Greek yogurt is naturally thick, it blends smoothly into the batter without adding excess moisture.
- If there is any liquid sitting on top of the yogurt, I always drain it before measuring. This small step helps maintain the correct consistency of the batter and prevents the cake from becoming too wet.
- Sweetened Condensed Milk
- Sweetened condensed milk provides both sweetness and richness. It blends easily with the yogurt and egg yolks, creating a smooth mixture that doesn’t require additional sugar.
- Its creamy texture also helps give the finished cake a soft interior while adding a subtle caramel-like sweetness that complements the vanilla perfectly.
- Cornstarch
- Although only a small amount is used, cornstarch plays an important role in the recipe. It adds just enough stability to the batter while keeping the cake light and delicate.
- Sifting the cornstarch before mixing helps prevent lumps and ensures it blends evenly throughout the mixture.
- Vanilla Bean Paste
- Vanilla bean paste gives the cake a warm, fragrant flavor along with tiny specks of vanilla that make each slice look beautiful.
- If vanilla bean paste isn’t available, pure vanilla extract can be used while keeping the ingredient amount exactly the same. Either option produces a lovely homemade flavor.
Kitchen Equipment That Makes Baking Easier
- Preparing this cake doesn’t require specialized baking tools, but having the right equipment makes the process much smoother.
- An 8-inch springform pan works especially well because the delicate cake can be removed without damaging the sides. Lining the pan with baking paper also helps release the cake easily after chilling.
- A hand mixer or stand mixer is almost essential for whipping the egg whites properly. While whipping by hand is possible, using an electric mixer creates stiff peaks much faster and with far less effort.
- You’ll also need two clean mixing bowls—one for the yolks and another for the egg whites. I always use glass or metal bowls because they stay free from grease more easily than plastic bowls.
- A rubber spatula is helpful for gently folding the whipped egg whites into the batter without knocking out the air that gives the cake its signature texture.
- Finally, a deep roasting pan is needed to create the water bath during baking. This gentle baking method helps the cake cook evenly while keeping the texture soft and smooth.
Preparing Before You Begin
- Before mixing the ingredients, I like to have everything measured and ready. This makes the process much more relaxed once the egg whites are whipped since they should be folded into the batter without unnecessary delays.
- The oven is preheated to 320°F (160°C), and the springform pan is lightly coated with cake release before lining both the base and sides with baking paper. Wrapping the outside of the pan with two layers of foil helps prevent water from entering while the cake bakes in the water bath.
- With the pan prepared and ingredients measured, everything is ready for mixing the batter.
Mixing the Batter
- Once everything is prepared, I begin by separating the eggs. The yolks go into one bowl while the whites are placed into another completely clean bowl. This step may seem simple, but it is one of the most important parts of the recipe. Even a tiny drop of yolk can stop the egg whites from whipping properly, so I always work carefully.
- The yolks are mixed with the sweetened condensed milk, Greek yogurt, and vanilla bean paste until the mixture becomes smooth and creamy. I then sift the cornstarch directly into the bowl before stirring again. Sifting helps distribute the cornstarch evenly and keeps the batter free from lumps.
- At this stage, the mixture looks thick, silky, and well blended. It doesn’t take long to prepare, but making sure every ingredient is fully incorporated creates a smoother final texture.
Whipping the Egg Whites
- The next step is what gives this cake its signature lightness. Using a hand mixer or stand mixer, I whisk the egg whites until stiff peaks form.
- The whites gradually change from a transparent liquid into a bright white foam. As more air is incorporated, they become glossy and hold their shape when the beaters are lifted.
- I always stop mixing as soon as stiff peaks appear. Continuing beyond this point can cause the egg whites to break down, making them watery instead of fluffy. Once that happens, they lose much of the air needed to support the cake during baking.
- Perfectly whipped egg whites should look smooth, thick, and stable without appearing dry.
Folding Everything Together
- Instead of adding all the whipped egg whites at once, I fold them into the yolk mixture in several batches.
- The first addition helps loosen the heavier batter. After that, I gently fold in the remaining egg whites using a spatula. I use slow lifting motions rather than stirring in circles because stirring removes the air trapped inside the whipped whites.
- Taking a little extra time during this stage makes a noticeable difference. A carefully folded batter stays light and fluffy, allowing the cake to rise beautifully in the oven.
- When the batter becomes evenly combined with no visible streaks of egg white, it is ready for the prepared cake pan.
Baking the Cake in a Water Bath
- One of my favorite parts of this recipe is the gentle baking method.
- After pouring the batter into the prepared springform pan, I place the pan inside a larger roasting tray. Hot water is carefully poured into the roasting tray until it reaches just below halfway up the outside of the cake pan.
- This water bath creates gentle, even heat while the cake bakes. Instead of cooking too quickly around the edges, the cake rises slowly and develops an incredibly soft texture.
- The cake bakes for about 45 minutes at 320°F (160°C). During this time, the top gradually turns a beautiful golden color while the center becomes set.
- I avoid opening the oven door while the cake is baking. Sudden temperature changes can cause delicate cakes like this one to sink before they have fully set.
Cooling the Cake Properly
- Once baking is complete, I switch the oven off but leave the cake inside.
- Allowing the cake to cool gradually inside the warm oven helps prevent sudden shrinking. This slow cooling process also gives the delicate structure enough time to stabilize.
- After the cake reaches room temperature, I transfer it to the refrigerator for at least two hours. When I have extra time, I prefer leaving it overnight because the texture becomes even smoother and easier to slice.
- Chilling also allows the flavors to settle, giving the cake a pleasantly creamy consistency.
Serving Suggestions
- One of the things I appreciate most about this cake is its simplicity. It doesn’t require heavy frosting or elaborate decorations to look inviting.
- Before serving, I lightly dust the top with powdered sugar. The white coating complements the golden surface and gives the cake a classic homemade appearance.
- Fresh sliced strawberries make an excellent topping because their natural sweetness balances the creamy flavor of the cake. Other fresh berries also pair beautifully if you already have them on hand.
- For a simple afternoon dessert, I often enjoy a slice exactly as it is without adding anything else.
Helpful Tips for the Best Results
- Although this recipe is straightforward, paying attention to a few details helps achieve the best possible texture.
- A completely clean mixing bowl is essential for whipping egg whites successfully. Glass or metal bowls usually work better because they are easier to keep grease-free.
- Using full-fat Greek yogurt also makes a noticeable difference. Its thick consistency gives the batter the right balance without adding excess moisture.
- Gentle folding is another key step. Mixing too vigorously removes the air from the egg whites, resulting in a heavier cake.
- Finally, patience during cooling is just as important as careful mixing. Giving the cake enough time to cool gradually and chill completely rewards you with a much smoother texture.
Common Mistakes to Avoid
- This cake is forgiving in many ways, but avoiding a few common mistakes helps ensure consistent results.
- One mistake is allowing egg yolk to mix with the whites before whipping. Even a small amount can make it difficult to achieve stiff peaks.
- Over-whipping the egg whites is another issue. Once the proteins begin breaking down, the mixture becomes watery and loses volume, leading to a denser cake.
- Skipping the water bath can also affect the final texture. Gentle baking helps keep the cake moist while preventing the edges from cooking too quickly.
- Opening the oven repeatedly is another habit worth avoiding. Each time the door opens, heat escapes, making it harder for the cake to maintain its rise.
Storing Leftovers
- If any cake remains, I store it in an airtight container in the refrigerator.
- It stays fresh for several days while maintaining its soft texture. Before serving again, I simply add another light dusting of powdered sugar if needed.
- Because the cake is served chilled, there is no need to reheat it.
Homemade Cloud Cake (5-Ingredient Flourless Cake) Recipe
Description
- This Homemade Cloud Cake is a light, airy, and naturally gluten-free dessert made with only five simple ingredients. Whipped egg whites give the cake its signature fluffy texture, while Greek yogurt and sweetened condensed milk create a smooth, creamy crumb. Chilled before serving, this cake is delicious with a light dusting of powdered sugar or fresh sliced strawberries.
Recipe Details
- Prep Time: 10 minutes
- Cook Time: 45 minutes
- Total Time: 55 minutes (plus at least 2 hours chilling)
- Servings: 10 slices
Equipment
- 8-inch (20 cm) springform cake pan
- Hand mixer or stand mixer
- Two mixing bowls
- Rubber spatula or metal spoon
- Fine mesh sieve
- Deep roasting pan (for water bath)
- Baking paper
- Aluminum foil
- Measuring cups and spoons
Ingredients
Cake
- 4 large eggs
- 1 cup (240g) full-fat Greek yogurt
- 1 cup (240g) sweetened condensed milk
- 1 teaspoon vanilla bean paste
- 1 tablespoon cornstarch (cornflour)
Optional for Serving
- 1 tablespoon powdered sugar
- 1 cup (200g) sliced strawberries
Instructions
- Step 1 – Prepare the Pan
- Preheat the oven to 320°F (160°C).
- Lightly grease an 8-inch springform pan with cake release. Line both the base and sides with baking paper, then wrap the outside of the pan with two layers of aluminum foil to protect it during the water bath.
- Step 2 – Separate the Eggs
- Carefully separate the egg yolks from the whites.
- Place the egg whites into a completely clean mixing bowl and the yolks into another bowl. Make sure no yolk gets into the whites, as this will affect how well they whip.
- Step 3 – Mix the Base
- Add the Greek yogurt, sweetened condensed milk, and vanilla bean paste to the bowl containing the egg yolks.
- Mix until smooth.
- Sift the cornstarch into the mixture and stir until fully combined.
- Step 4 – Whip the Egg Whites
- Using a hand mixer or stand mixer, beat the egg whites until stiff peaks form.
- Stop mixing once the peaks hold their shape. Overbeating can reduce the volume and affect the cake’s texture.
- Add the whipped egg whites to the yolk mixture in three or four additions.
- Step-5 Fold the Batter
- Use a spatula or metal spoon to gently fold everything together with slow lifting motions until no white streaks remain.
- Avoid stirring vigorously to keep as much air in the batter as possible.
- Step 6 – Prepare the Water Bath
- Pour the batter into the prepared cake pan.
- Place the pan inside a deep roasting tray.
- Carefully add hot water to the roasting tray until it reaches just below halfway up the outside of the cake pan.
- Take care not to splash water into the batter.
- Step 7 – Bake
- Bake for 45 minutes, or until the cake has risen and the top is lightly golden.
- Once baking is complete, turn off the oven and leave the cake inside until it cools completely.
- Step 8 – Chill
- Remove the cooled cake from the oven and refrigerate for at least 2 hours or overnight for the best texture.
- Step 9 – Serve
- Before serving, lightly dust the cake with powdered sugar if desired.
- Top with sliced strawberries and cut into slices.
- Serve chilled.
Notes
- Use full-fat Greek yogurt for the best texture. Thinner yogurts contain too much liquid.
- If any liquid has collected on top of the yogurt, drain it before measuring.
- A glass or metal mixing bowl works best for whipping egg whites because it stays free from grease.
- Beat the egg whites only until stiff peaks form. Overwhipping can make them watery and reduce the cake’s volume.
- Fold the whipped egg whites gently to preserve the air that gives the cake its light texture.
- Do not open the oven door during baking, as sudden temperature changes may cause the cake to sink.
- Cooling the cake gradually in the switched-off oven helps prevent cracking or collapsing.
- Chilling the cake before slicing gives it a firmer texture and cleaner slices.
- Store leftovers in an airtight container in the refrigerator for up to 3 days.
Nutrition (Per Serving)
- Calories: 141 kcal
- Carbohydrates: 19g
- Protein: 7g
- Fat: 4g
- Saturated Fat: 2g
- Polyunsaturated Fat: 0.4g
- Monounsaturated Fat: 1g
- Trans Fat: 0.01g
- Cholesterol: 77mg
- Sodium: 71mg
- Potassium: 166mg
- Fiber: 0.01g
- Sugar: 18g
- Vitamin A: 178 IU
- Vitamin C: 1mg
- Calcium: 119mg
- Iron: 0.4mg