 Skip to content
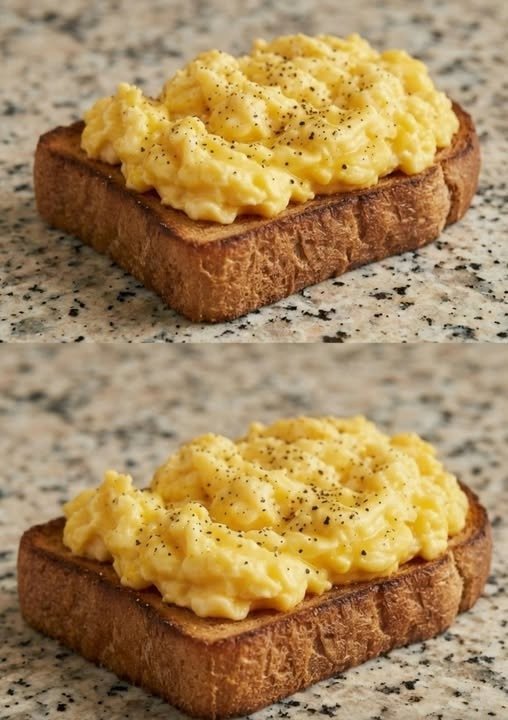
Healthy Soft, Fluffy & Creamy Scrambled Eggs are one of those recipes that seem incredibly easy, yet the difference between ordinary and exceptional eggs comes down to a few small details. With the right method, it only takes about a minute to create soft, creamy eggs that are tender instead of dry. This recipe has become a regular part of my breakfast routine because it is quick, comforting, and made with ingredients that are almost always available in the kitchen.
I enjoy making scrambled eggs when I want something satisfying without spending much time cooking. Whether it is a busy weekday morning or a slow weekend breakfast, this recipe never disappoints. The eggs stay moist, fluffy, and rich in flavor without needing complicated techniques or special equipment.
The secret is not adding extra ingredients or cooking for a long time. Instead, gentle heat, slow movements, and removing the eggs from the pan at the right moment make all the difference. These small steps help create soft folds of egg with a creamy texture that pair perfectly with warm buttered toast.
Table of Contents
Why This Recipe Works
- Many people think scrambled eggs should be stirred constantly over high heat. While that certainly cooks the eggs quickly, it often results in dry, crumbly pieces that lack the smooth texture most people enjoy.
- This method focuses on cooking the eggs gently. Instead of rushing through the process, the eggs are slowly pushed across the pan so they naturally form soft curds. These larger folds stay tender and hold their moisture better than finely broken pieces.
- Adding a small amount of milk helps create a softer texture, although the recipe also works well without it. Butter provides flavor while helping prevent the eggs from sticking to the pan. Together, these simple ingredients create scrambled eggs that are rich without being heavy.
- Another reason this recipe works so well is that the eggs finish cooking from the remaining heat after leaving the stove. This prevents overcooking, which is one of the most common mistakes when making scrambled eggs.
Ingredients You’ll Need
- This recipe uses only a handful of everyday ingredients. Since there are so few of them, using fresh, good-quality ingredients makes a noticeable difference.
- EGGS
- Eggs are naturally the star of the recipe. I usually prepare two eggs per person, which makes a satisfying breakfast serving. Fresh eggs produce a smoother texture and richer flavor. Depending on what the hens are fed, the yolks may vary in color from pale yellow to deep orange. Either works well, but vibrant yolks often create a richer-looking final dish.
- Milk
- A small amount of milk is optional but highly recommended if you enjoy extra creamy scrambled eggs. It blends into the eggs while whisking and helps create a softer texture. Only a little is needed because too much liquid can make the eggs watery instead of creamy.
- Butter
- Butter serves two purposes in this recipe. It lightly coats the pan to prevent sticking while also adding a rich, buttery flavor that complements the eggs beautifully. As it melts, it creates the perfect base for cooking the egg mixture evenly.
- Salt
- Salt enhances the natural flavor of the eggs without overpowering them. Mixing it into the eggs before cooking helps distribute the seasoning evenly throughout every bite.
- Black Pepper
- Freshly ground black pepper adds a mild kick and balances the richness of the eggs. You can always sprinkle a little extra over the finished dish before serving.
- Bread for Serving
- Warm toasted bread with butter is a classic companion for creamy scrambled eggs. The crisp texture of the toast contrasts beautifully with the soft eggs, making every bite satisfying.
Kitchen Tools That Make the Job Easier
- Although this recipe is very simple, using the right equipment makes the cooking process much easier.
- Non-Stick Skillet
- A non-stick skillet allows the eggs to move freely across the surface without sticking. It also makes cleanup much quicker. If using cast iron, make sure it is well seasoned before cooking.
- Rubber Spatula
- A flexible rubber spatula is ideal because it easily reaches every corner of the pan. It gently lifts the cooked eggs while allowing the uncooked portion to spread across the hot surface.
- A flat wooden spoon can also be used if needed, but a rubber spatula provides the smoothest results.
- Mixing Bowl
- Whisking the eggs in a bowl before they reach the pan ensures the yolks and whites combine completely. This helps create an even texture throughout the finished scramble.
Preparing the Ingredients
- One of the best things about this recipe is how quickly it comes together. Before turning on the stove, I like to prepare everything first because the eggs cook very fast.
- I crack the eggs into a bowl, add the milk, salt, and black pepper, then whisk everything together until the mixture becomes smooth and evenly colored. There should be no visible streaks of egg white remaining.
- While the eggs are being mixed, I place the skillet over medium heat and allow it to warm for a minute. Once the pan is heated, the butter is added and left to melt completely. It should coat the bottom of the skillet without browning.
- Having everything ready before cooking begins means there is no need to rush once the eggs are in the pan.
Tips for Soft and Creamy Scrambled Eggs
- Making great scrambled eggs is less about speed and more about paying attention to texture. These simple tips consistently produce better results.
- Cook Over Moderate Heat
- High heat causes the eggs to cook too quickly, making them dry before they have time to develop soft curds. Medium heat works well for most stovetops, while stronger burners may require medium-low heat.
- Move the Eggs Gently
- Instead of stirring rapidly in circles, gently push the eggs across the skillet using long, slow strokes. This allows the uncooked eggs to flow into the empty spaces while the cooked portions naturally fold over themselves.
- Don’t Overcook
- The eggs should still look slightly glossy when removed from the heat. They continue cooking for several seconds from the warmth of the pan, resulting in a perfectly tender texture.
- Choose the Right Pan Size
- Using the correct skillet size helps the eggs cook evenly. A pan that is too large causes the eggs to spread too thin, while a pan that is too small may cook them unevenly. A medium skillet works well for four eggs and provides enough space for the eggs to form soft folds naturally.
How I Make Soft and Creamy Scrambled Eggs
- Once the eggs are whisked and the butter has melted, everything comes together very quickly. This is why I always keep the spatula nearby and have the toast ready before I start cooking.
- I pour the egg mixture into the warm skillet and let it sit undisturbed for about five seconds. During this short time, a thin layer of egg begins to set on the bottom of the pan. Instead of stirring immediately, I allow this first layer to form because it creates the soft folds that make scrambled eggs look and taste so much better.
- Using a rubber spatula, I slowly push the cooked egg from one side of the pan toward the center. As I move the cooked portion, the uncooked egg naturally flows into the empty space and starts cooking. I continue this motion across the pan using long, gentle strokes rather than quick circular stirring.
- After about thirty seconds, I begin folding the eggs as well. I gently lift sections of cooked egg and turn them over so every part cooks evenly. The goal is not to break the eggs into tiny pieces but to encourage large, soft curds that stay moist.
- Within about one minute, the eggs are almost fully cooked. At this stage, they should still appear glossy and slightly soft. I remove the skillet from the heat before they look completely done because the remaining warmth in the pan continues to cook them for several seconds. This simple step keeps the eggs creamy instead of dry.
- If I want the eggs slightly firmer, I simply let them rest in the warm pan for another few seconds before serving. It is much easier to cook them a little longer than it is to fix overcooked eggs
How to Know When the Eggs Are Ready
- One question many people have is how to tell when scrambled eggs are perfectly cooked. Instead of relying only on time, I pay attention to their appearance.
- The eggs should gather into soft folds that hold together without excess liquid running across the pan. At the same time, they should still have a slight shine on the surface. That glossy finish is a good sign that the eggs are moist and tender.
- If the eggs become dull, dry, or begin turning golden brown, they have stayed on the heat too long. Properly cooked scrambled eggs should remain bright yellow with no crispy edges.
- Another simple test is to gently lift a portion with the spatula. The eggs should hold together softly without falling apart into dry crumbs.
Best Ways to Serve Scrambled Eggs
- One of the reasons I enjoy this recipe so much is how versatile it is. These creamy scrambled eggs fit into almost any breakfast and pair well with many simple side dishes.
- My favorite way to enjoy them is on slices of hot buttered toast. The crisp bread balances the creamy eggs perfectly, making every bite satisfying.
- For a heartier breakfast, scrambled eggs can also be served with:
- Buttered toasted bread
- Crispy bacon
- Breakfast sausages
- Sausage patties
- Sautéed spinach
- Garlic mushrooms
- Fresh sliced tomatoes
- Hash browns or roasted potatoes
- Avocado slices
- Fresh fruit on the side
These combinations make the meal feel complete while still allowing the creamy eggs to remain the star of the plate.
Helpful Tips for the Best Results
- After making scrambled eggs many times, I have found that a few simple habits consistently improve the final dish.
- Always whisk the eggs thoroughly before they go into the pan. Fully combining the yolks and whites creates a smooth, even texture.
- Use fresh butter rather than adding it after cooking. Melting it directly in the skillet adds flavor while helping prevent sticking.
- Avoid overcrowding the pan. If cooking a larger batch, use a larger skillet so the eggs have enough room to cook evenly.
- Keep the spatula moving slowly. Gentle strokes create beautiful folds, while vigorous stirring breaks the eggs into small dry pieces.
- Serve the eggs immediately after cooking. Scrambled eggs taste best when they are fresh and warm.
Common Mistakes to Avoid
- Even though scrambled eggs are simple, a few mistakes can affect the final texture.
- Cooking Over High Heat
- High heat causes the eggs to firm up too quickly before soft curds have time to form. The result is usually dry, rubbery eggs.
- Stirring Too Aggressively
- Rapid stirring chops the eggs into tiny fragments instead of allowing larger folds to develop. Slow movements produce a much creamier texture.
- Leaving the Eggs on the Stove Too Long
- Eggs continue cooking after they leave the heat. Waiting until they look completely done before removing them often leads to overcooked eggs by the time they reach the plate.
- Using Too Much Milk
- A small amount of milk helps improve texture, but adding too much can make the eggs watery. The recipe already includes the right balance.
- Letting the Butter Brown
- Butter should melt gently without becoming dark. Browned butter changes the flavor and can leave brown spots on the eggs instead of keeping them bright yellow.
Storing and Reheating
- Scrambled eggs are always best enjoyed immediately after cooking because they have the softest texture.
- If there are leftovers, allow them to cool completely before placing them in an airtight container. They can be refrigerated for up to two days.
- To reheat, warm them slowly in a skillet over low heat while stirring gently. A microwave can also be used, but short heating intervals help prevent the eggs from becoming rubbery.
- Freezing is generally not recommended because the texture changes after thawing, making the eggs less creamy.
Healthy Soft, Fluffy & Creamy Scrambled Eggs
- Soft, creamy scrambled eggs made with gentle heat and slow folding for tender, fluffy curds. Perfect with warm buttered toast for a quick and comforting breakfast.
Recipe Details
- Prep Time: 1 minute
- Cook Time: 1 minute
- Total Time: 2 minutes
- Course: Breakfast
- Servings: 2
Ingredients
Scrambled Eggs
- 4 large eggs
- 2 tablespoons milk (optional)
- 1/4 teaspoon salt
- 2 grinds black pepper
- 1 tablespoon (15 g) butter, margarine, or oil
For Serving
- 4 slices bread, toasted
- Butter for spreading
Instruction
- Prepare the Eggs
Crack eggs into a bowl. Add milk, salt, and black pepper. Whisk until smooth and evenly combin - Heat the Pan
Place a non-stick skillet over medium heat. Add butter and melt completely without browning. - Cook the Eggs
Pour the egg mixture into the pan. Leave untouched for about 5 seconds until the bottom begins to set. - Create Soft Curds
Slowly push the cooked egg from the edges toward the center using a spatula. Continue with gentle strokes, allowing uncooked egg to flow onto the hot surface
- Finish Cooking
After about 30 seconds, lift and fold the eggs into soft curds. Cook until the eggs are set but still slightly glossy. Remove from heat while they are slightly underdone and fold gently for another 10 seconds - Serve
Spoon the scrambled eggs onto hot buttered toast. Add extra black pepper if desired and serve immediately.
Recipe Tips
- Milk is optional but adds extra creaminess.
- Cream can replace milk for a richer flavor.
- Avoid high heat to prevent dry, rubbery eggs.
- Slow pushing and folding creates softer curds than rapid stirring.
- Remove eggs slightly early because they continue cooking from residual heat.
Serving Ideas
- Serve with:
- Buttered toast
- Crispy bacon
- Breakfast sausages
- Garlic mushrooms
- Sautéed spinach
- Fresh avocado
- Roasted potatoes
- Fresh fruit
Storage
- Store leftovers in an airtight container in the refrigerator for up to 2 days.
- Reheat gently in a skillet over low heat or microwave in short intervals, stirring occasionally. Freezing is not recommended.
Nutrition (Per Serving)
- Calories: 182 kcal
- Carbohydrates: 1 g
- Protein: 12 g
- Fat: 14 g
- Saturated Fat: 6 g
- Cholesterol: 343 mg
- Sodium: 473 mg
- Potassium: 145 mg
- Sugar: 1 g
- Vitamin A: 683 IU
- Calcium: 68 mg
- Iron: 2 mg