 Skip to content
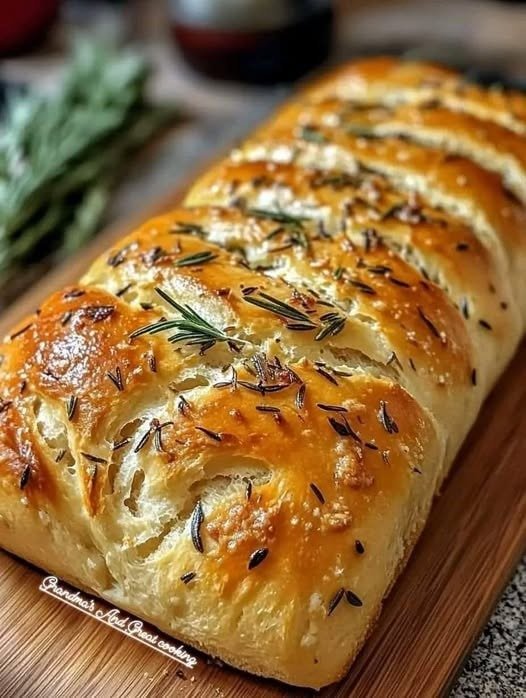
Whenever I want fresh homemade Easy Keto Air Fryer Bread without heating up my oven, this Easy Keto Air Fryer Bread is one of the first recipes I think about. It has a crisp crust, a soft and chewy center, and slices beautifully once cooled. Even though it’s made without traditional wheat flour, it still has a satisfying texture that reminds me of rustic homemade bread.
What I enjoy most about this recipe is how simple it is. Everything comes together in one mixing bowl with just a few pantry ingredients. After a short resting time, the dough is shaped, placed into the air fryer, and baked until golden. The air fryer creates a wonderfully crisp exterior while keeping the inside moist and tender.
This bread works well for breakfast, lunch, or snacks. I often serve it with butter, cream cheese, avocado, or sliced cheese. It also makes excellent toast the next day.
Table of Contents
Why I Like Making Bread in the Air Fryer
- Using an air fryer for bread may sound unusual at first, but it has become one of my favorite kitchen shortcuts. Instead of waiting for the oven to preheat, I can prepare the dough while the air fryer gets ready.
- The circulating hot air helps develop a nicely browned crust without drying out the loaf. Since the loaf is smaller than a traditional oven-baked bread, it cooks evenly and finishes in less time.
- Another advantage is that the kitchen stays cooler, which is especially nice during warm weather.
What Makes This Bread Different
- Although this loaf doesn’t contain traditional grain flour, it still develops a pleasant bread-like texture. The combination of carefully selected dry ingredients creates a dough that holds together well and slices cleanly after cooling.
- Instead of being light and fluffy like sandwich bread, this loaf has a rustic character. The crust becomes pleasantly firm while the inside stays moist and slightly chewy.
- I enjoy that every slice feels hearty enough for sandwiches or simply spread with butter.
Ingredients That Work Together
- Each ingredient has its own purpose in creating the finished loaf.
- Full-fat Greek yogurt adds moisture while helping create a soft crumb.
- Eggs provide structure and help the bread rise properly while keeping everything together during baking.
- Apple cider vinegar works alongside the baking powder to encourage a better rise and contributes to the finished texture.
- Blanched almond flour forms the main base of the bread and creates a mild flavor.
- Coconut flour absorbs moisture and helps balance the consistency of the dough.
- Oat fiber gives the loaf a more traditional bread-like texture without making it heavy.
- Psyllium husk powder is one of the key ingredients. It absorbs moisture and gives the bread its chewy texture while helping the loaf hold together after baking.
- Baking powder helps the loaf rise during cooking.
- Salt enhances every ingredient and gives the bread a balanced flavor.
- Sunflower seeds are optional, but I almost always include them because they add a pleasant crunch and a slightly nutty taste.
Mixing the Dough
- I always begin by whisking together the yogurt, eggs, and apple cider vinegar until smooth.
- In another bowl, I combine all of the dry ingredients thoroughly before adding them to the wet mixture. Mixing the dry ingredients first helps distribute everything evenly throughout the dough.
- Once both mixtures are combined, the dough begins to thicken fairly quickly. At this stage, I don’t rush. Allowing the dough to rest for five minutes makes a noticeable difference because the dry ingredients absorb moisture and the dough becomes much easier to handle.
- If I’m adding sunflower seeds, I mix them in after the resting time.
Shaping the Loaf
- The dough is slightly sticky, so I lightly wet my hands before shaping it.
- I place the dough onto a piece of parchment paper and gently form it into a loaf about 7 inches long and 4 inches wide. It doesn’t need to look perfect because the rustic shape gives the finished bread its homemade appearance.
- Sometimes I shape it into an oval instead of a rectangle depending on how I plan to serve it.
- Keeping the parchment paper only slightly larger than the loaf allows the hot air to circulate around the bread more effectively.
Baking in the Air Fryer
- Once the loaf is ready, I carefully transfer it into the air fryer basket.
- The bread bakes at 340°F for about 35 minutes.
- Halfway through cooking, I carefully flip the loaf over using a clean kitchen towel. This extra step helps both sides brown evenly and keeps the crust crisp all around.
- As the bread finishes baking, the kitchen fills with a warm aroma that always reminds me of freshly baked homemade bread.
Cooling Is Worth the Wait
- One thing I’ve learned is not to slice the bread immediately after it comes out of the air fryer.
- Allowing it to cool gives the inside time to finish setting. Cutting it too early can make the texture seem softer than it actually is.
- After cooling, the loaf slices much more neatly and keeps its shape beautifully.
My Favorite Ways to Serve It
- This bread is incredibly versatile.
- For breakfast, I like serving it with butter or cream cheese.
- For lunch, it makes a sturdy sandwich that doesn’t fall apart.
- It also pairs nicely with sliced ham, cheese, or mashed avocado.
- Sometimes I simply toast a slice and spread a little herb butter over the top for a quick snack.
- Because the loaf has a firm texture, it also works well alongside soups and salads.
Helpful Tips for Success
- I always use fresh baking powder because it helps produce the best rise.
- Mixing the dry ingredients thoroughly before combining them with the wet ingredients keeps the dough consistent.
- Giving the dough its full five-minute resting time is important since it allows the ingredients to hydrate properly.
- Wet hands make shaping much easier and prevent sticking.
- Flipping the loaf halfway through baking encourages even browning on all sides.
- Finally, cooling the bread completely before slicing produces the best texture.
Storing the Bread
- After the bread has cooled completely, I store it in a bread bag or a covered container on the counter for two to three days.
- If I need it to last longer, I keep it in the refrigerator for up to five days.
- For longer storage, I slice the loaf first before placing the slices into a freezer-safe bag. Frozen slices are easy to remove individually whenever I need fresh bread.
Easy Keto Air Fryer Bread Recipe
Description
- A homemade air fryer bread with a crisp golden crust and a soft, chewy interior. This easy loaf comes together with simple ingredients, requires minimal preparation, and is perfect for breakfast, sandwiches, snacks, or serving alongside soups and salads.
Prep Time
- 10 minutes
Cook Time
- 35 minutes
Total Time
- 45 minutes
Yield
- 16 slices
Ingredients
- ½ cup full-fat Greek yogurt
- 4 large eggs
- 2 tablespoons apple cider vinegar
- 1 cup blanched almond flour
- 2 tablespoons coconut flour
- 2 tablespoons oat fiber
- 2 tablespoons psyllium husk powder
- 1 tablespoon baking powder
- 1 teaspoon salt
- ½ cup sunflower seeds (optional, or other seeds such as sesame or pumpkin seeds; use unsalted)
Instructions
- In a large mixing bowl, whisk together the Greek yogurt, eggs, and apple cider vinegar until smooth.
- In a separate bowl, combine the almond flour, coconut flour, oat fiber, psyllium husk powder, baking powder, and salt.
- Gradually add the dry ingredients to the wet mixture and stir until a thick dough forms.
- Let the dough rest for 5 minutes so the dry ingredients can absorb moisture.
- If using sunflower seeds, gently fold them into the rested dough.
- Place the dough onto a sheet of parchment paper and shape it into a loaf approximately 7 x 4 inches. Wet your hands if needed to prevent sticking.
- Trim the parchment paper so it extends only slightly beyond the loaf, then place it into the lowest position of the air fryer basket.
- Air fry at 340°F (170°C) for 35 minutes.
- Carefully flip the loaf halfway through cooking using a clean kitchen towel or heat-safe utensil.
- Once baked, remove the bread from the air fryer and allow it to cool before slicing.
- Slice and serve with butter, cream cheese, cheese, ham, avocado, or your favorite toppings.
Notes
- Allow the dough to rest before shaping for the best texture.
- Wet hands make shaping much easier.
- Sunflower seeds are optional but add extra flavor and crunch. Sesame or pumpkin seeds can also be used.
- Store covered at room temperature for 2–3 days.
- Refrigerate for up to 5 days.
- Slice before freezing and store in a freezer-safe bag for up to 1 month.
Nutrition (Per Slice)
- Serving Size: 1 slice
- Calories: 94 kcal
- Carbohydrates: 6 g
- Protein: 5 g
- Fat: 7 g
- Fiber: 3 g
- Sugar: 1 g