 Skip to content
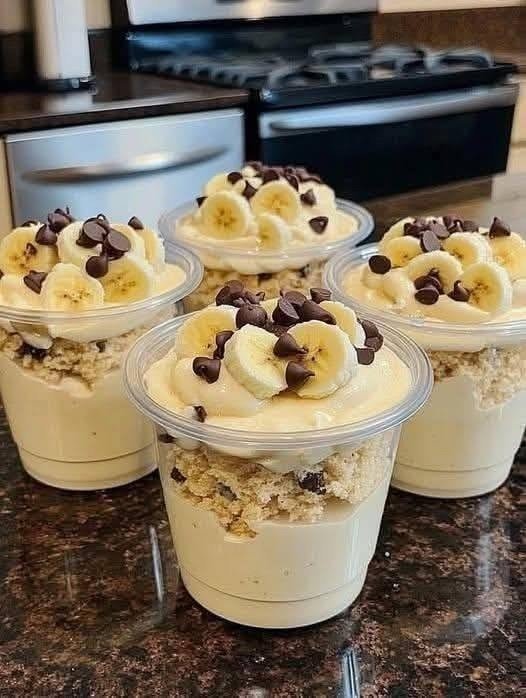
This High Protien banana pudding is one of those desserts that quietly becomes a regular in the kitchen. It doesn’t require baking, it doesn’t ask for complicated steps, and yet it comes together into something layered, creamy, and familiar. It’s the kind of dish that fits just as well after a simple dinner as it does on a table filled with food for guests.
What makes it work is the balance: smooth pudding, soft bananas, and that light crunch from wafers that slowly soften as it chills. Every spoonful ends up slightly different, but that’s part of the appeal.
he process is straightforward, but a few small details make all the difference, especially when it comes to texture and flavor
The ingredients and how they come together in real use
- Each ingredient has a clear role, and keeping them in the right condition matters more than anything else.
- The base starts with cream cheese (8 ounce block, softened to room temperature). This is important because if it is even slightly firm, it won’t blend properly and the pudding can turn out lumpy. At room temperature, it becomes smooth and helps create that rich, thick base.
- Next comes sweetened condensed milk (14 ounce can). This is where the sweetness and creamy depth come from. It is important not to confuse it with evaporated milk, since evaporated milk does not bring the same sweetness or texture and won’t set the same way.
- The structure of the pudding comes from instant vanilla pudding mix (5 ounce box, INSTANT). It must be instant style because cook-and-serve pudding behaves completely differently and will not set properly in this recipe.
- To help the pudding mix properly, milk (3 cups, 2% or higher) is added. Whole milk also works well, and both give the pudding its smooth consistency.
- For flavor, vanilla extract (2 teaspoons) is used. Some people sometimes switch part of this with banana extract to increase the banana flavor, but vanilla keeps it classic.
- The lightness in the dessert comes from whipped topping (8 ounce tub, thawed, divided use). It is usually folded in partially and also used on top at the end.
- The structure and crunch come from Nilla wafers (11 ounce box, divided use). These form the layers and soften slightly after chilling, becoming cake-like over time.
- Finally, the fruit element is bananas (5–7 bananas, peeled and sliced, divided use). The bananas should be ripe, meaning yellow with light speckling. Overripe bananas become too soft too quickly, and green ones lack sweetness.
Making the pudding base
- The first step is preparing the creamy filling. A large mixing bowl is used for this.
- The softened cream cheese is beaten first using a mixer until it becomes smooth and fluffy. This step should not be rushed. Any small lumps at this stage will carry through the entire dessert.
- Once smooth, sweetened condensed milk is added. After that, the instant pudding mix and milk go in. At this point, the mixture may look slightly uneven, but it gradually comes together as it is mixed.
- Vanilla extract is added next and stirred in thoroughly.
- It helps to start mixing on a lower speed so the milk does not splash. As everything begins to combine, the mixture thickens. If there are small lumps, continued mixing usually smooths them out. The cream cheese sometimes settles at the bottom, so scraping the bowl ensures everything is fully incorporated.
- After the base is mostly smooth, half of the whipped topping is folded in. This lightens the mixture and prepares it for layering.
Building the layers
- The layering is what turns the mixture into banana pudding rather than just a bowl of cream.
- A trifle dish, large glass bowl, or a 9×13 dish works well. The layers are built slowly and evenly.
- The first layer starts with one-third of the Nilla wafers. Some pieces can be placed upright along the sides if using a clear dish, though that is optional.
- Next comes a layer of sliced bananas. These should be spread evenly so every bite will have fruit.
- Then one-third of the pudding mixture is poured over the top, covering the bananas completely.
- The same process is repeated two more times:
- wafers
- bananas
- pudding mixture
- The final layer ends with pudding on top.
- Once layered, the remaining whipped topping is spread across the surface, creating a soft, smooth finish.
Chilling and texture development
- After assembling, the dish is covered tightly with plastic wrap and placed in the refrigerator.
- It needs at least 1 to 2 hours to chill. During this time, the pudding thickens further and the wafers begin to soften. The texture shifts from separate layers into a unified dessert that still keeps its structure but feels creamy throughout.
- It can be chilled longer if needed, and often tastes even better after more time in the fridge.
Keeping bananas from turning brown
- Bananas naturally begin to brown once sliced, especially when exposed to air. There are a couple of simple ways to slow this down without changing the flavor too much.
- A light sprinkle of citric acid powder over the sliced bananas can help slow browning. It should only be a small amount so it does not affect taste.
- Another option is to lightly coat the banana slices in lemon juice or orange juice. Again, the key is to use just enough to coat them lightly, not soak them, so the flavor of the dessert stays the same.
- Even with these steps, some browning will still happen over time, especially after the pudding has been served.
Storage and how long it keeps
- Once prepared, banana pudding should be stored in an airtight container or tightly covered dish in the refrigerator.
- It stays fresh for up to three days when properly refrigerated. It is best to chill it as soon as it is assembled.
- After serving begins and layers are exposed, the bananas will start to brown more quickly. This is normal and expected.
- Freezing is not recommended because the texture of the pudding and whipped topping changes too much once thawed.
A few practical notes from experience
- The most important part of this recipe is making sure the cream cheese is fully soft before mixing. If it is even slightly cold, it can leave small lumps that are hard to remove later.
- It is also important to double-check the pudding mix. It must be instant pudding. Cook-and-serve versions do not set properly in this type of dessert.
- The same attention applies to the milk choice. Sweetened condensed milk is required, not evaporated milk, since evaporated milk will not give the same sweetness or texture.
- Bananas should be chosen carefully. Slightly speckled yellow bananas work best because they are sweet but still firm enough to hold their shape in layers.
Serving the pudding
- Once chilled, the pudding is usually served straight from the dish. A large spoon helps scoop through all the layers so each serving includes wafers, bananas, and pudding together.
- It works well for gatherings because it can be prepared ahead of time and kept chilled until serving. The flavors continue to settle as it rests.
High Protein Banana Pudding — Recipe
Description
- Indulge in a creamy, delicious, and protein-packed twist on the classic banana pudding! This High Protein Banana Pudding combines the natural sweetness of ripe bananas with the rich creaminess of Greek yogurt and protein powder to create a satisfying dessert that supports your fitness goals.
- Perfect for breakfast, a post-workout snack, meal prep, or a healthy dessert, this recipe delivers a smooth pudding texture with a delicious banana flavor while providing a high amount of protein to help support muscle recovery and keep you feeling full for longer.
- Unlike traditional banana pudding recipes that are often loaded with sugar and heavy ingredients, this healthier version is made with simple, wholesome ingredients and can easily be customized to match your nutrition goals. Add crunchy granola, nuts, peanut butter, or chocolate toppings to create your favorite flavor combination.
- Whether you are working toward muscle gain, weight management, or simply looking for a healthier sweet treat, this High Protein Banana Pudding is an easy, tasty, and nutritious option that the whole family can enjoy.
Instructions
Step 1: Prepare the Protein Cream
- Add Greek yogurt, milk, protein powder, vanilla extract, cinnamon, and salt to a large mixing bowl.
- Whisk or blend until completely smooth and creamy.
- If using sugar-free pudding mix, slowly add it and mix well.
- Let the mixture sit for 5 minutes to allow it to thicken.
Step 2: Prepare the Banana Layer
- Peel and slice bananas into thin rounds.
- Keep a few slices aside for decoration.
- Avoid slicing the bananas too early if preparing ahead, as they may darken.
Step 3: Build the Pudding Layers
- In a glass dish or individual cups:
- Add a layer of protein pudding mixture.
- Add a layer of banana slices.
- Add a layer of crushed biscuits, granola, or nuts.
- Repeat the layers until the container is filled.
- Finish with a layer of protein pudding on top.
Step 4: Chill & Serve
- Cover and refrigerate for 2–3 hours.
- Allowing it to chill helps the flavors combine and creates a thicker pudding texture.
- Add toppings before serving.
Ingredients
For the Protein Pudding Base
- 2 cups thick Greek yogurt (plain or vanilla, preferably high protein)
- 2 scoops vanilla protein powder
- 1 cup low-fat milk or unsweetened almond milk
- 1 packet sugar-free vanilla instant pudding mix (optional, for a classic pudding texture)
- 1 teaspoon vanilla extract
- 1–2 tablespoons honey or maple syrup (optional, depending on sweetness preference)
- ½ teaspoon cinnamon (optional)
- A small pinch of salt (enhances flavor)
For the Banana Layers
- 3 large ripe bananas, sliced
- 1 cup crushed whole-grain biscuits, vanilla wafers, or granola (optional)
- ¼ cup chopped walnuts, almonds, or peanuts (optional)
Optional Toppings
- Extra banana slices
- Cinnamon sprinkle
- Peanut butter drizzle
- Dark chocolate shavings
- Protein granola
- Chopped nuts
Approximate Nutrition (Per Serving)
- Calories: 300–400 kcal
- Protein: 30–40 g
- Carbohydrates: 35–50 g
- Fat: 5–10 g
- Fiber: 4–6 g